Showing posts with label ASL SK. Show all posts

Tuesday, 27 November 2012

AAR - ASL SK Scenario #S43 - Clearing Carentan

Moving into Carentan
S43 Clearing Carentan
Attacker: American (506th PIR, 101st Airborne Division) (GaryB)
Defender: German (Fallschirmjäger Regiment 6) (GaryG)
Turns: 6 Players:
OBA: None  
Night: No
Date(s) Played: 20/11/2012
Carentan, France 1944-06-12


Starting Board Position
For full details on set-up, please see our introduction blog entry for S43.

Turn #1
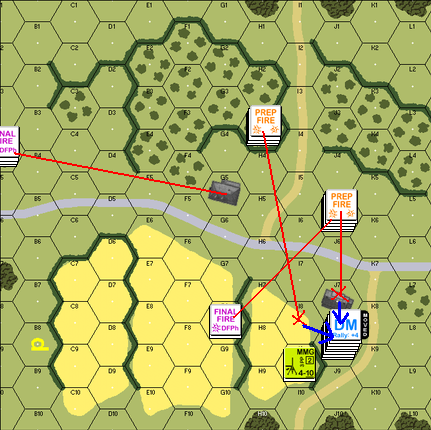
A very tough first turn for the Americans who as yet are unaware of the immediate German threats from their hidden squads (D6 and F5) and artillery markers (G7 and F7). They open up with some area [A] fire vs. building hex J5, trying to uncover and hidden units there. The roll has no effect and they remain uncertain of who or what is in J5.

During the movement phase they CX (double-time) an 8-0 leader with and 7-4-7 squad crossing open ground at B5 to the east of Carentan [B]. It was early in the game, but I had to reveal one of my hidden units, an 8-1 leader / 5-4-8 with LMG, in D6 to fire on them. I score a hit and break both his leader and the 7-4-7 squad [B]. 
  
American Turn #1
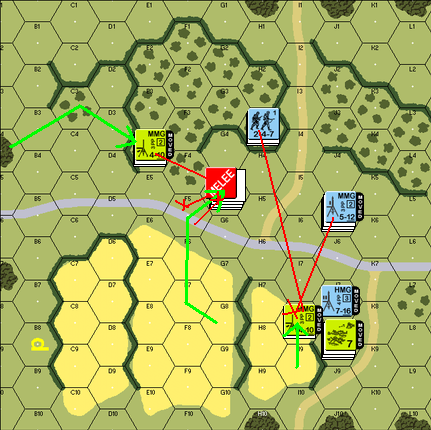
The Americans have an easier time in the west of Carentan [C], advancing their 9-1 leader and two 7-4-7s through building hexes to close in on J5 (where GaryB believes I have a hidden squad). They take some light fire from my German 2-3-8 squad, but it has no effect.

Centrally [D] the Americans move into position to cross the street and settle into F7 and G7, critically my hidden artillery targets. With movement over, I defensive fire at the American 7-4-7 / 3-3-7 stack in G7 breaking both of his units with heavy fire from my 5-4-8 / MMG / 2-3-8 in I4. Not a great start for the Allies as nearly half of their squads have been broken already!

In my German turn I call in my artillery during prep fire targeting building hexes F7 and G7 [E], but both rolls have no effect. That could have been a game finisher if the rolls had gone the German's way. Other fire during the turn had no effect, but I did manage to move my 8-1 leader / 5-4-8 with LMG from D6 and initiate close combat in B6 [F]. The Americans lost a 7-4-7 and an 8-0 leader in this assault.

German Turn #1
Turn #2
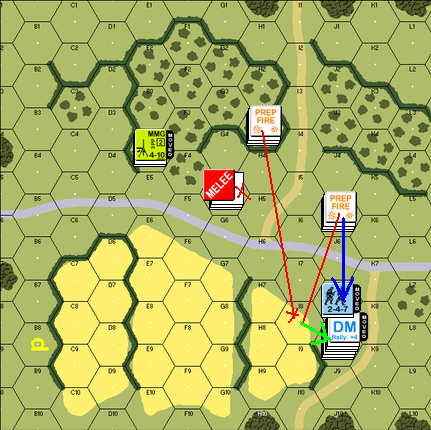
In turn #2 the Americans licked their wounds and rallied some of their troops creating an 8-0 leader with a 1,1 roll during rally phase. In movement they evacuated [G] building hexes G7 and F7 to avoid further artillery hits, leaving only the broken 3-3-7 half-squad behind. Needing to keep the pressure up and counter some of their losses, they advanced a 10-2 leader and 7-4-7 squad with DC into building hex D6 under the cover of smoke [H]. Again though the German defence was strong (with a 1,2 DR) and they broke both units as they entered the building. Disaster for the Allies as their best leader was broken!
 
American Turn #2
I wanted to press my advantage and used more artillery fire on G7 [I] to eliminate the broken American 3-3-7 half squad there. From the east I assault moved my 8-1 leader and 5-4-8 with LMG into C6 to force his broken stack out of the building hex D6. During advancing fire I managed to casualty reduce the broken American 7-4-7 in D6 [J] and they used low crawl to flea into an open hex at D7.

The American stack in building hex E8 was still strong (the new 8-0 leader 2 x 7-4-7s and 1 x MMG) and they continued area-fire vs. E5 to try and uncover my final hidden unit, presumably before attempting to cross the street [K]. Other fire was exchanged in the centre of Carentan, but with no effect.
 
German Turn #2
Turn #3
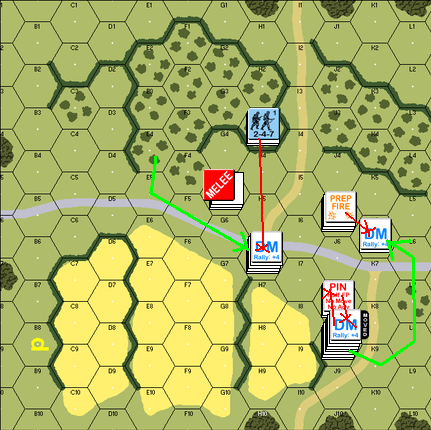
Turn #3 saw the 10-2 leader escape to join his friends in E8, but the 7-4-7 with him was killed under heavy PBF from my German stack in D6 [J]. Otherwise exchanges of prep fire and defensive fire had no effect. The Americans were running out of time and bogged down in repeated prep-fire due to the losses they had sustained so far.

Turn #4
More prep fire from the Americans broke the German 8-1 leader in D6 [L], but held up their strongest squads for another turn. In movement phase a 7-4-7 crossed the street successfully into building hex J3 [M] taking ineffective fire from the German 4-4-7 in N3. Buoyed up by this success the 9-1 leader / 7-4-7 in J5 move to follow them, but are broken by MMG fire from H4 and forced to stop in building hex K5 [N]. Nothing seems to be working out for the Americans.
 
American Turn #4
I'm sorry to say that this game looked ripe for the German plucking and it pushed me into some questionable moves as I tried to finish MrBingers off... :)

I began with some prep fire from my 5-4-8 / MMG / 2-3-8 in H4 [O] at his broken units in K5*, but malfunction my MMG in the process with a 6,6 roll. In movement I pushed two fairly weak units into positions really close to the enemy and in one case [Q] directly into close combat.

A 2-3-8 was moved into I3 [P], but took fire on the way at I2, fortunately for me the Americans missed. Separately I moved a 4-4-7 from N3 into L5 to prepare for close combat with his broken units in K5 [Q]. The resulting close combat would fail for both sides.

German Turn #4

Defensive firing the Americans successfully broke (and casualty reduced) my 5-4-8 in D6 [R]. Nothing terrible here for the Germans, but the moves in turn #4 would cost them heavily in turn #5...

*I need to make a rules check as I believe that firing here from H4 to K5 was enough to automatically DM the American units there. We played that it didn't, but I need to review.

Turn #5
The game was really closing out now and we both knew that it was all but lost for the Americans, but they did have a few parting shots to deal with first. During rally phase they successfully brought back a 9-1 leader / 7-4-7 in K5 completely swinging the balance in that building hex [U]. 

American Turn #5

Forgoing prep fire for once they moved their big stack (10-2 leader, 8-0 leader, 2 x 7-4-7s, 1 x MMG and 1 x DC) from E8 to C7 under the cover of smoke [V]. They also successfully fired on D6 breaking the half-squad there and forcing them to rout across the street to safety [W].

Three very winnable close combats at [T], [U] and [V] played out in favour of the Americans with the Germans losing a 4-4-7 in K5 [U], an 8-0 leader in D6 [V] and a 2-3-8 in I3 [T].

These final few close combats couldn't however change the result and the Americans surrendered at the end of American turn #5.

RESULT: The Americans (GaryB) conceded to the Germans (GaryG) at the end of their turn #5.


Historical Aftermath
Once established in the town, the paratroopers divided up into small groups each of which began neutralizing German positions in buildings and alleys. Major von der Heydte, commander of the Fallschirmjägers and in charge of the defence of Carentan, had withdrawn most of the defenders from the town during the night to avoid being surrounded. The rearguard that remained, however, were seasoned troops a fought skilfully, including the pre-registered key positions for artillery and mortar bombardments. 

Through the course of the morning, the paratroopers took position after position until the remaining Fallschirmjägers were forced to retreat out of town. While the next day would bring another German counter-attack, this time featuring the feared SS, they would never again control Carentan.

Conclusions
GaryG - A good scenario, which was more than slightly impacted by the poor first few turns that the Americans suffered. We did get it closed off in one evening's play though, which is good. We intend now to play the same scenario again this time switching sides.
 

GaryB - I will have to mark this one up as a learning game. I was happy enough with my set-up but made a critical mistake CXing the units on the left in the first turn. My original intention was to move the units to D6 to support the main force crossing the road in the centre. The right flank went better and I was able to move them to the J5 building where I was concerned Lt Gardner had deployed a hidden unit. It was a couple of unfortunate rolls which scuppered my progress early on, these were in response to errors on my part however ASL SK punishes you severely and I got knocked about very badly. I was very lucky in hindsight to survive the beautifully targeted artillery blasts in the most part. I did much better in the later stages of the game when perhaps GaryG felt he had the game won and was able to be more adventurous. On the round, I have to report, "Must do better - See me after class"
  

Tuesday, 20 November 2012

Intro ASL SK - #S43 Clearing Carentan

Assaulting Carentan
Our next starter kit scenario takes us to Carentan in June 1944... 
S43 Clearing Carentan

Attacker: American (506th PIR, 101st Airborne Division) (GaryB)
Defender: German (Fallschirmjäger Regiment 6) (GaryG)
Turns: 6 Players: 2 OBA: None Night: No
Carentan, France 1944-06-12

RESULT: The Americans conceded on turn #5

Overview
The key in the initial assaults on the Cotentin Peninsula was the town of Carentan. Control of this vital town of approximately 4,000 people would allow the Utah and Omaha beaches to be securely joined. At approximately 0530 on June 12th elements of the 101st Airborne under the command of artillery commander Brig. Gen. Anthony McAuliffe deployed for the attack scheduled to start at 0600. The initial assault instantly bogged down with well-sited machine gun fire pinning the paratroopers along the road into Carentan, but company commanders rallied their troops and quickly grabbed a foothold in town. Now came the difficult task of capturing the town as well-trained paratroopers began clearing building after building.


Victory Conditions 
The Americans win at game end by controlling all buildings on/between hexrows D-J in hexes numbered </= 5 (Highlighted by yellow boxes on the map below). The Americans set-up below the blue line and the Germans above it.

Set-Up Rules & Victory Locations

German Initial Set-Up

Initial German Set-Up

In setting up I have:

> a 7-0 leader in building hex H3 to rally any broken unit withdrawals in the centre.
> a 2-3-8 and 5-4-8 with MMG in building hex I4 covering the central N/S road and West towards N4
> a 2-3-8 in building hex L2 helping to cover the open area ahead in K4, L4,M4 etc
> a 4-4-7 in building hex N3 covering the N/S road West towards N8

I also have the support of an 8-1 leader / 5-4-8 with LMG and an 8-0 leader / 5-4-8 with LMG all set-up with hidden initial placement. The 8-1 Leader / 5-4-8 with LMG in hex D6 and the 8-0 Leader / 5-4-8 with LMG in hex F5 (marked with a green circles in the map above).

Two hexes have been nominated as artillery attack points for the Germans to use at any time during the battle. These were F7 and G7 (marked with a target on the map above).

The Americans begin with the following squads and support and will set-up >/= hex-row "8" between A and P


Initial American Set-Up
In setting up the Americans have:

> an 8-0 leader and a 7-4-7 squad in hex A8
> a 3-3-7 half-squad in building hex E8
> a 7-4-7 squad with DC in building hex E9
> a 7-4-7 squad in building hex D8
> a 10-2 leader and 7-4-7 squad with MMG in building hex G9
> a 9-1 leader with two 7-4-7 squads in building hex M8

From a defensive point-of-view, I'm quite happy with the American set-up as they are very likely to encounter both of my hidden stacks in D6 and F5 and are very close to my artillery targeted hexes F7 and G7.

Let's see how this one plays out...

>>>AAR for S43

Thursday, 15 November 2012

Learning ASL Starter Kit Part 4

As we move into Turn #4 things are balanced quite well, but the British forces are due to arrive from the South to support their American allies. Will it be too little too late?

American/British Turn #4
I needed to get my arriving British squads into action pretty quickly and double-timed them to take up positions to the South, South-South-West and South-West of Avola. I wanted to attack GaryB's Italian positions from a number of directions and try to water-down his fire-power as much as possible.

GaryB's positions still looked quite strong, but I felt that I could take advantage of some of his squad positioning in the South and exploit hexes not covered by his fire-lanes.

British Advance in Turn #4
The British would need to be quite reckless in their movement in order to take these Southern buildings, so I needed my American squads to breakthrough in the North and get into supporting positions as quickly as the could.

As it turned out the Americans did much better than I'd expected. They supported the melee at (A), broke units in the buildings around (B) readying a close combat opportunity for Turn #5 and eliminated the Italian squads and leader to the West of town (C).

The Italians take heavy losses in the North of Avola

These were major losses for the Italians and I was beginning to feel confident about the final result for the first time in the game. Further progress around (B) and (C) would cut-off Italian fall-back options for their Southern squads.

Italian Turn #4
Licking their wounds the Italians dropped PREP PHASE FIRE into a number of British and American positions and were unlucky with their rolls. They did however manage to recover a 3-4-6 Squad at (D), coupling it with an 8-1 Leader, but their MMG in this area was still broken. Elsewhere they recovered and retreated a 1-2-6 squad creating a 6+1 Leader in the process (E). 


British defensive fire at (F) broke the Italian squad there and it fell back a hex awaiting the onslaught.

American/British Turn #5
The squeeze was on! Again forgoing PREP FIRE I assaulted from the South, squad by squad to take up positions around (H), (I) and (J). The British took some heavy fire here, but came away with only two broken units, a 4-5-7 and a 9-1 Leader. By the end of the turn I had engaged the Italians in close combat in both (I) and (J) and forced them to break and flee from (H). (J) resulted in the Italian squad's elimination.


"The Squeeze!"

Meanwhile my Americans took up positions to fully cover the town's square and eliminated an Italian Leader at (G). Things were looking great for me, but I still had to break of destroy ALL Italian units to achieve a victory.

Finale!
As we closed out Italian Turn #5 the American's were picking off fleeing squads and readying themselves to take the final few buildings holding Axis troops. The final turn of the game was American/British Turn #6 where the Allies focused their assaults into two areas shown on the map below. The resulting close combats, although not conclusive were enough to break/eliminate the remaining Italian units and the game was called. Victory to the Allies!

Last Stand of The Italian 146th Infantry in Avola, Sicily
S9 Ambitious Assault 
Result: Victory for the British/Americans (GaryG) vs. the Italians (GaryB) in Turn #6.

Conclusions
GaryG - The scenario is a good one and I especially enjoyed the mixture of terrain available and the two-flank attack from the Allies. You really do have to push hard from the very start when playing the Allies. I was lucky with some of my rolls around Turn #4 and still only managed to beat the Italians in my final game turn. 

I'm fairly happy with my coverage of the rules. We did get a few small things wrong, but on the whole the sessions played smoothly without too much downtime to check the rules book. We'll probably play one further infantry scenario before moving up to first artillery and then vehicles.

GaryB - Pending

Tuesday, 6 November 2012

Learning ASL Starter Kit Part 3

Moving into Turn #3 of starter kit scenario S9 - Ambitious Assault and every move for my Allies seemed to becoming more and more critical. With only four full turns ahead, I had to keep up the pressure and give myself a fighting chance at victory.

American Turn #3
It took us a full evening on VASL last night to complete turn #3, an indication of the amount of careful consideration we were putting into each move and the amount of fighting now taking place. The British still wouldn't arrive until turn #4, so it was down to my strong American parachute infantry to build on their early momentum.

Board Position At The Start Of American Turn #3
The map above shows the board position at the beginning of turn #3, with the green arrows indicating the positions that my American squads would try to assault this turn.

A Miserable Assault Attempt From The Americans
The Italians had failed to recover their broken leader in N7 (above) and I elected to have no PREP FIRE instead moving straight into the MOVEMENT PHASE.

From the East side of the map (left) I needed to move down to Close Combat his 3-4-6, so I sent my 3-3-7 across the street and into the building beside the 3-4-6 Italians (A). I had cover from the units at (C) and knew that the building would give me good protection against his 3-4-6 despite the point-blank shot. He rolled a 1,2 (2D6) and I failed my morale check breaking the 3-3-7 and leaving 2 residual fire-power in the hex.

I still had an 8-0 leader and a 7-4-7 squad to move and stupidly decided to avoid the residual fire-power and moved them as a stack (to get leader movement bonus) over the edge of the hill at point (B). This of course brought them into line-of-sight for his groups on hill (C).

A Couple Of Pinning Shots Couldn't Slow The Americans
The 8-0 leader made it to the building, but the 7-4-7 got pinned on the hill by his 3-4-6 squad with a LMG. His other roll from (C) with 3-4-6, 8-1 leader and MMG would fail and malfunction his MMG in the process, so I figured I'd gotten off lightly for my mistake... Not so as GaryB would later target this isolated unit, PREP FIRING from (C) during his turn to eliminate my 7-4-7. Nightmare!

I need to be more careful when moving.

Board Position At The Start Of Italian Turn #3
I had better success in the West of Avola although only after a shaky start. I assault moved a 7-4-7 squad into the trees at (D) only to see them pinned by a fortunate shot from the hill at O9. Close Combat there would need to wait. Elsewhere I assaulted squads across the street (E) to take the units and building around (F). The Italian squad there malfunctioning their LMG in a desperate defence.

By the end of Allied turn #3 the board postion was as follow:

(G) - American 3-3-7 had routed back to building hex L2

(H) - The (soon to be eliminated) 7-4-7 sitting exposed on the hill, with my 8-0 leader hiding in the adjacent building.

(I) - GaryB's central Italian squads had a malfunctioned HMG and failed to repair it in the RALLY PHASE of turn #3.

(J) - An American 7-4-7 squad, with MMG and a 9-2 leader have all but taken buildings in this area.

(K) - A 9-1 leader with two 7-4-7 squads waited to fire on O9.

Italian Prep Fire Phase
Italian Turn #3
During the Italian RALLY PHASE they failed to repair their HMG and the Americans recovered the lost Italian LMG in M8 only to find it unusable. The Italian 7-0 leader in N7 also recovered from his broken state.

Most of the Italian action was concentrated on PREP FIRE (right) as they gained one major success in eliminating the American 7-4-7 at position (L) on the hillside. The rest of their fire that phase was largely ineffective.

During MOVEMENT they assault moved their 7-0 Leader into O8 (M) in view to moving him into the buildings on the opposite side of the street.

In his eagerness to put pressure on my broken 3-3-7 in building hex L2 (below) GaryB moved his 1-3-6 from P2 to try and move towards Close Combat. He missed my LOS from the 7-4-7 / HMG stack in M6 (O) and took heavy fire, breaking just as he left the building (N). His unit missed it's ELR and dropped to a 1-2-6. Looks like we both need to be more careful when moving :)

Italians Caught In The Open
Heavy Fire From The Americans
It would be the DEFENSIVE FIRE that would prove most costly for the Italians as the Americans used some heavy fire-power targeting (P) and (Q) forcing both units to break. The 1-3-6 at (P) low crawling into O7 and the 3-3-6 at (Q) routing into the relative safety of hex P9.

By the end of Turn #3 my Americans had made a little progress and were in a reasonably good position. How critical would the loss of the 7-4-7 on the hillside to the North prove to be?

In Turn #4 the Americans will have the support of a significant British force made up from elements of the British 50th Infantry Division. They arrive at beginning of Turn #4, but have some distance to cover before reaching Avola.

British Forces Arriving On Turn #4
 With just three full turns left here is the board position at the end of Turn #3.

Board Position At The End Of Turn #3

Monday, 29 October 2012

Learning ASL Starter Kit Part 2

We've walked-through some of the examples from richfam's excellent aslsk tutorial and GaryB has completed his Italian set-up to hold the town of Avola, Sicily.

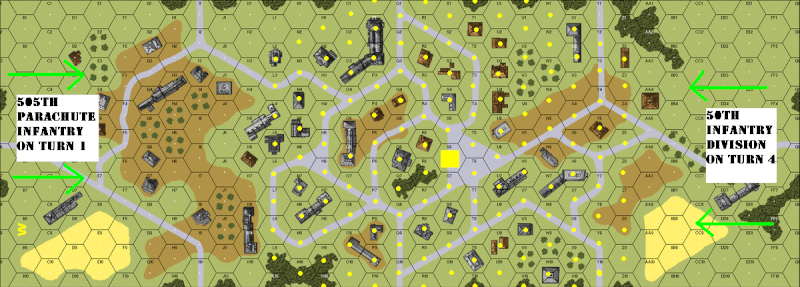
In this scenario, Ambitious Assault (S9), elements of the Italian 146th Regiment are defending the small coastal town of Avola against units of the American 505th Parachute Regiment (arriving on Turn #1 from the North edge of the map) and elements of the British 50th Infantry Division (arriving on Turn #4 from the South edge of the map).

In setting up his Italians GaryB had to place them up-to seven hexes from S6, indicated by a yellow square on the map below.


GaryB's thoughts on his set-up "I was a little overwhelmed when I sat down to organise my defensive set-up, I had gone over the basic rules with GaryG and understood the counter designations and so on. Having never played before I did not have a feel for how fast the units would move, how far they would turn one etc. I settled for choosing what I thought would be the best locations for my support weapons and then would place my remaining troops in positions that would slow the Allies down. The first unit I placed was a regular 3-4-6 unit in hex O6 with the HMG, as from this elevated central location he could attack units on all the hills on each side of the map. I also placed my best leader in this location to maximise its effectiveness. The MMG I placed on hill W6 in the southern section to hold the British when they arrived. I placed LMGs in support of the HMG in O5, and the MMG in U5. The final LMG I placed with two 3-4-6 units on the road hex L8 with the intention of moving into the buildings K8/K9 as I guessed these would become key locations in the American attack. I was to rue this last decision as I underestimated how quickly the Allies would move into position"

Victory conditions state that the Allies win if the Italians have no unbroken multi-man counters (MMCs) in their original set-up zone (highlighted within the yellow area on the map above).

Turn #1
GaryB's set-up was solid enough, but I thought that I could exploit his soft underbelly by focusing my attack from the Western tree-line, just past the hills outside of Avola. This was Sicily after all!

Even at this early stage I was conscious that I needed to move quickly, so I sent two four elite units, with MMG and two quality leaders double-timing towards the trees. My other slightly weaker units would split off towards the East and make a delayed attack from that side of the town.

In response GaryB wisely moved his Italian troops into safer positions to the West, avoiding an unnecessary early encounter with the Americans. This was a delaying game for him after all, so engaging a stronger force head-on probably wouldn't be a good strategy.

End Of Turn #1
American Turn #2
In my first assault of the game I moved a 7-4-7 (with 9-1 leader) under the cover of smoke into tree hex M10 (point B on the map below). They took heavy fire from the Italian machine gun nest in the hills towards the centre of town, pinning the leader and breaking the squad. Not a great start!

I took the positions K8/K9 easily, despite fire from across the street and set-up two 7-4-7s with MMG. My key squad, another 7-4-7 (with 9-2 leader), would use the smoke and try to break across the street to get into close combat with the Italian LMG squad in M8. The roll went against me though and my unit got pinned at the tree-line under fire from two Italian 3-4-6 squads just to the South. Two turns in and I already feel like I'm running out of time...

American Turn #2
Meanwhile to the East, my 8-0 leader with 7-4-7 and 3-3-7 squads move into position having avoided any Italian attention.

Italian Turn #2
Settling for Prep fire the Italians focused their attention on taking out my MMG position at K8, but only managed to pin the unit, with other fire being largely ineffective. I had more success though in my defensive fire by fire-grouping against the 3-4-6 squad and 7-0 leader in M7, breaking both and casualty reducing the 3-4-6 to a 3-3-6 conscripts squad.

Italian Turn #2
The Americans are finally getting somewhere. Turn #3 would be a critical one and the buildings to the NW of town would need to be taken.

Tuesday, 23 October 2012

Learning ASL Starter Kit Part 1

ASL Starter Kit #2
I've posted some of my completed ASL SK scenarios previously on this blog, but most of them were actually played two years ago. I have a new opponent now so it's time to dust off the D6s and Infantry Fire Tables and get stuck into some ASL again.

I've had a look through the scenarios from both ASL SK #1 and #2 and picked scenario S9 Ambitious Assault as our starting point. S9 is the first scenario from Starter Kit #2 and covers a battle in Avola from the invasion of Sicily, July 1943.

This will be very much a learning game for my opponent GaryB. He has a lot of gaming experience, but hasn't yet played any ASL. I've always found it tougher to attack in ASL, so I will take the British/Americans attackers and let GaryB concentrate on his defensive positions. The scenario archive webpage also balances this towards the Italian defenders, so hopefully this will offset the starting gap in experience.  

S9 Ambitious Assault

Attacker: British/American (505th PIR/50th Infantry Division) (GaryG)
Defender: Italian (146th Regiment, 206th Coastal Defence Division) (GaryB)
Turns: 6 Players: 2 OBA: None Night: No
Avola, Sicily 1943-07-10

RESULT: Turn #6 win for GaryG and his American/British squads

Overview
Avola, Sicily, 10 July 1943: Operation Husky got off to a terrible start as gale-forced winds greeted the poorly-trained transport pilots flying in the paratroopers and glider men of the British 1st Airborne Division and the 505th Parachute Infantry Regiment of the American 82nd Airborne Division. Instead of dropping behind the Allied beaches and seizing key bridges and strong-points, they were scattered all over the southern half of the island. One such group of men landed near the coastal town of Avola with Lt. Sammon the ranking officer. After a brief council with the remaining officers, he ordered this adhoc group of 75 paratroopers armed only with light weaponry to attack Avola in order to assist the British whose seaborne invasion of Sicily was starting to land.

Italians must hold out against a combined attack from two sides. The US attack with 5 squads, an MG and 3 leaders and the British enter the battle at the midway point.

Victory Conditions:
The Allies win at game end if there are no unbroken Italian MMC </= 7 hexes from S6, the yellow square.

Map/Victory Area:
Map
I'll be posting up our progress, so please keep an eye on the blog, or subscribe for future updates.

Bingers, Lt Gardner is back!


Friday, 12 October 2012

Time For ASL Starter Kits Again?

ASL Starter Kit #1
I've posted up a few older AARs for Advanced Squad Leader Starter Kit scenarios over the past few months, so perhaps now is the time to add some new history to my ASLSK play.

Background to the ASLSK Series

Full ASL Rules Binder
Advanced Squad Leader has been around for many years, but always seemed too daunting a system to learn given the size and depth of the rules binder. MMP, the current publisher of ASL products, recognised this and in 2004 released Advanced Squad Leader: Starter Kit #1 covering infantry and small arms combat only. By 2007 they had expanded the range to include Advanced Squad Leader: Starter Kit #2 (battlefield ordnance) and Advanced Squad Leader: Starter Kit #3 (armoured vehicles), each coming with their own updated rulebook, new counters, mew maps and new scenarios.


ASL Starter Kits #1 - #3
With each update the starter kit rulebook has evolved to take on new units, weapons and terrain considerations to provide an ASL "light" experience without feeling that you've lost too much vs. the full system. Opinions vary, but I feel that ASLSK provides an excellent (and accessible) infantry combat system without the level of time investment required by the full ASL. If I played full ASL it would probably be at the expense of all the other games I play. I would be happy, but there's a great big world of games out there!

My ASLSK Boxes
Don't get me wrong the ASLSK is still a hefty investment, especially early on, as it's rulebook reaches 28-pages by SK#3. Best to get someone to teach you if possible, or at least to work-through the rules with. 

I have played through most of SK#1 and some of the SK#2 scenarios, but will probable move back to infantry only as I'm teaching a new player this time around.

The Appeal of Advanced Squad Leader

The Guards Counter-attack (SL)
One of my earliest wargaming experiences was with Avalon Hill's Squad Leader and I still remember playing The Guards Counter-attack scenario with a friend of mine. That's why I enjoy ASLSK so much, the boards are similar (albeit thinner) to the original Squad Leader boards and the system for me represents a pure approach to squad level gaming. Biased? Yes, but in a good way :).

I have other newer games waiting to be played, but recent conversations about ASL have really whetted my appetite again.

I'll post up soon with details of the scenarios we choose.

Sunday, 7 October 2012

ASL SK Scenario #S42 - One More Hedgerow

Beyond The Beaches
Another war room archive and one of my favourite ASL Starter Kit scenarios to date.

One More Hedgerow
Attacker: American (1st Battalion, 116th Regiment, 29th Infantry Division) (ANDREW)
Defender: German (Infanterie Division 352) (GARY)
Turns: 5.5 Players: 2 OBA: None Night: No
Couvains, France 1944-06-13

RESULT: Germans (GARY) win on final turn.

Overview
Both sides believed that St. Lo, a key crossroads astride the Vire River, was crucial to the defence of Normandy. The Germans were committed to defending the approaches to Hill 192 which commanded the Bayeux-St. Lo road. Despite heavy casualties on D-Day, the 29th Infantry Division remained at the forefront of the American drive from Omaha to St. Lo and was charged with crossing the Elle River and protecting the right flank of the 2nd Division as it advanced on Hill 192. The Elle was a small, fordable stream, only 10 feet wide, but the very steep and wooded southern bank gave good ground for well-concealed emplacements. Its crossing would involve a number of bitterly contested actions. The American V Corps had advanced rapidly since getting off of Omaha Beach on June 7th, but that was about to stop as the battle for the hedgerows had begun.

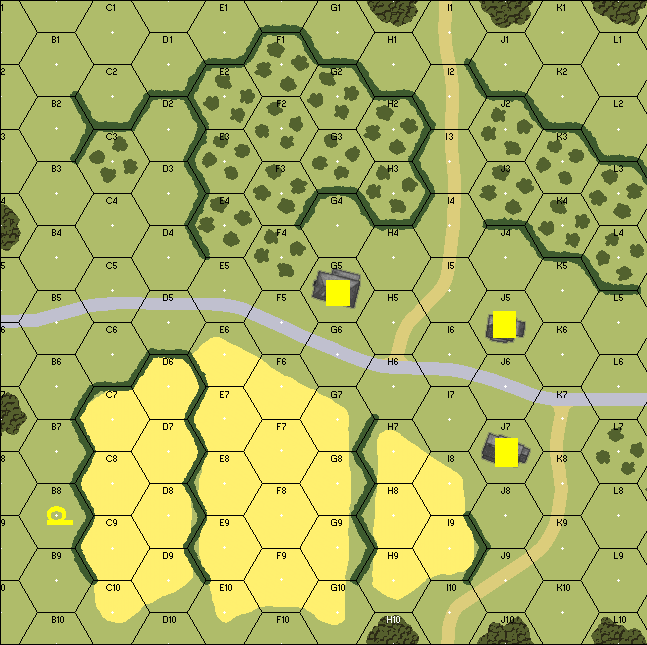
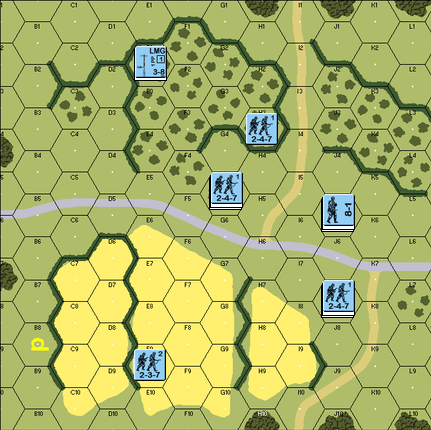
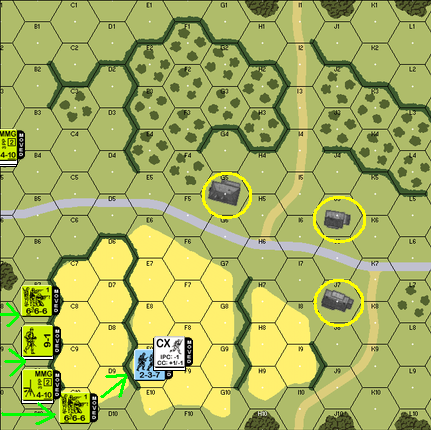
Victory Conditions: The Americans win at game end by controlling building hexes G5, J5 and J7 (Highlighted on map below)

Turn #1

With the Germans setting up with hidden initial placement the Americans would have to tread carefully (but quickly) through the Normandy bocage.

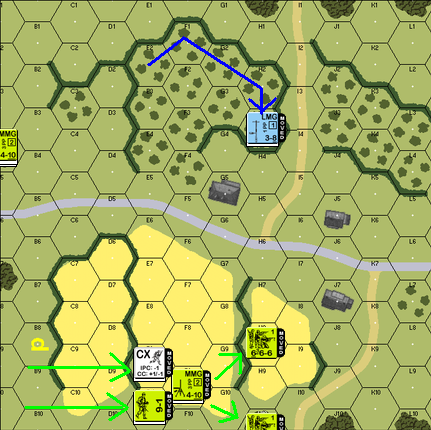
During their first turn the Americans pushed along from the southern edge of the map, electing to move through the slowing grain instead of the orchards to the North. This surprised me as in previous games speed had always been an issue for the attacker. Needless to say my (hidden) units were protecting a more northern attack ... but Andy didn't know that. The picture below is a snapshot at the end of American turn one - the Americans were spraying bullets into selected hexes to try and weed out any hidden German units. This worked and a defending 2-3-7 was uncovered and eliminated in close combat. The yellow circles are the target (victory buildings)

End of turn 1
Turn #2

The Germans, wishing to remain hidden to maximise their advantage (and not betray their lack of forces on the southern flank) held fire, so we moved onto American turn 2, which saw the strong American squads push along the southern edge of the map and trying to weed out more German units. The Germans during their second turn move a 2-3-7 Half-squad / LMG to cover the advance of the Americans.

End of turn 2
Turn #3

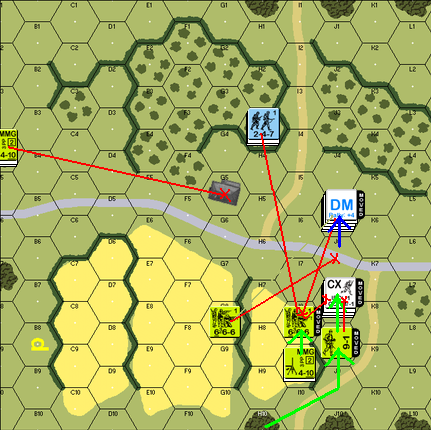
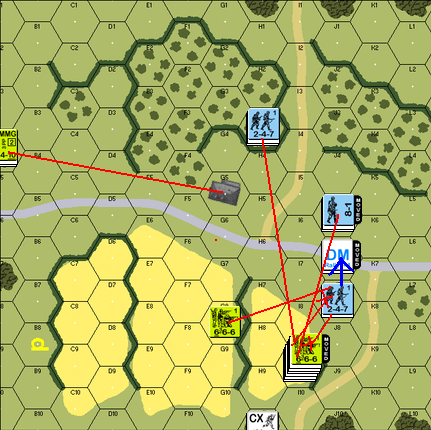
Entering turn 3 and things were beginning to heat up, the Americans using smoke to reach their first objective at J7. I was fairly confident here a the building held my strongest single force 4-6-7 / HMG / 2-3-7. This confidence wasn't to last long as I rolled a 6,6 only pinning the American unit (I had a massive 24 fire-power) and malfunctioning my HMG on it's first shot! Self donk Things were looking bleak as Andy moved more units into close combat range, threatening to take the first building with relative ease ... not so however as his approaching 6-6-6 unit was broken from J7 and more defensive fire from H3 broke his already pinned unit and he would be unable to enter close combat. Result!
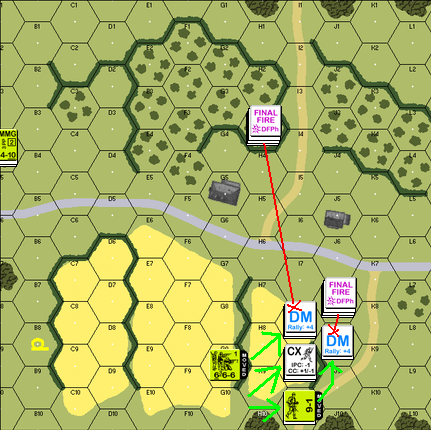
Mid turn 3
The German turn 3 was no less eventful, especially now that the Americans had a juicy stack of units in I9 for us to shoot at. I successfully repaired my broken HMG and fired on I9 from three different hexes (see map) resulting in one broken American squad (importantly the one with the MMG). In the American defensive fire they broke my full squad 4-6-7 in J7 and I routed them back towards the leader in J5. This would later turn out to be an important move for me.

End of turn 3
Turn #4

With only a 2-4-7 in J7 I attempted (and failed) to recover the HMG there. Given the amount of American fire-power pushing towards J7, the building was all but lost. 6-6-6 moved from I9 to I8 and was pinned there and a 9-1 leader and 6-6-6 moved from I9 to J8 under smoke cover. The 2-4-7 defender in J7 rolled 1,1 but only managed to pin the leader. A final 6-6-6 also moved into J8 (from the trees at H10). Remaining fire from both sides was ineffective, leaving the Americans a fairly straight-forward close combat to take their first objective building J7, killing the 2-4-7 in the process.

End of American turn 4
Onto German turn 4 and the Americans fail to recover the German HMG left in J7. The Germans rally the broken 4-6-7 in J5 and ready themselves for the attempt to regain J7! During Prep Fire from J5 to J7 both American 6-6-6s are broken (this was probably the most critical engagement for both sides0, swinging the initiative back to the Germans following a sustained period of American progress. Further Prep Fire from H3 also broke the 5-4-6 in I8. The broken American units (2 x 6-6-6s and 1 x 5-4-6) rout to the 9-1 leader in J8.

End of German turn 4
Turn #5

The broken American units in J8 ALL fail to rally, but a 5-4-6 in I9 returns and moves into I8 only to be broken there by German defensive fire from J5. A 7-0 leader / MMG / 6-6-6 from I4 moves through cover to E4 attempting to put pressure on the hidden unit in building G5. 6-6-6 in G8 also moves on G5 moving right up to the building, taking point blank fire from the 2-4-7 / 7-0 leader / LMG in there. The Germans roll a 6,6 and another machine gun malfunctions! Are things starting to shift back to the Americans?

The Americans move into close combat in G5, but fail to make their ambush count and the battle moves into melee.

End of American turn 5
Two American units rally in J8, a 6-6-6 and a 5-4-6 (leaving one broken 6-6-6). The Germans then prep fired from H3 into the broken 5-4-6 in I8 reducing them to a 2-3-6. The Germans then take the opportunity to regain J7 by assault moving a 2-4-7 from J5 and then moving into J7 during APh. Unnecessary advancing fire from the remaining units in J5 against the already broken I8 malfunctions the German MMG in J5 (the 3rd of the game). I could have kicked myself at this point as the attack wasn't needed and I had now left myself weaker in what could end up being my last building.

Close combat in G5 results in the loss of a German 2-4-7, leaving only a weak leader defending the building.

The broken American unit routs from I8 into J8 with the 9-1 leader.

End of German turn 5
 Turn #6

The last turn of the game. It looked like the Americans would have just too much to do in their last turn to take back building J7, close off combat in G5 and take the German held J5 and this proved to be true, especially when the German 2-4-7 in J7 successfully recovered the HMG there.

Prep Fire into J7 only pinned the German unit there. A 9-1 leader from J8 attempted to draw fire by moving beside J5, but the Germans held-fire waiting for the movement of the American 7-0 leader / MMG / 6-6-6 in E4. As it turned out this unit's movement was cut shot at H6 as it broke under fire from H3. The game was effectively over as German defensive fire J7 > J8 and J5 > K6 broke the last effective American units. Objective buildings j5 and J7 were held and the Germans came out on top.

End of American turn 6 (and game end)

Final thoughts on this scenario...

I had set-up for an American attack along the northern edge as I thought this would be the quickest path for the Allies (bar coming straight up the middle!). Andy's set-up therefore was quite worrying as I had few forces in the south. (see German set-up positions below)

My Initial Set-Up For The Germans

At this point I decided that my best strategy was to stay hidden for as long as possible (Andy didn't know that I was weak in the south) and hope that it would slow him down. it didn't slow him as much as I would have liked but it did serve to make his movement a little more cautious (therefore a little slower). I really bemoaned my luck early on as I lost my first unit quite easily and then had my HMG malfunction on it's first use!

As the scenario progressed the luck would balance itself though first swinging one way then back the other leading to an exciting, if very stressful, finale. Obviously delighted to finish on top, but this one could easily have gone to the Americans.