Showing posts with label War Room Archive. Show all posts

Sunday, 7 October 2012

ASL SK Scenario #S42 - One More Hedgerow

Beyond The Beaches
Another war room archive and one of my favourite ASL Starter Kit scenarios to date.

One More Hedgerow
Attacker: American (1st Battalion, 116th Regiment, 29th Infantry Division) (ANDREW)
Defender: German (Infanterie Division 352) (GARY)
Turns: 5.5 Players: 2 OBA: None Night: No
Couvains, France 1944-06-13

RESULT: Germans (GARY) win on final turn.

Overview
Both sides believed that St. Lo, a key crossroads astride the Vire River, was crucial to the defence of Normandy. The Germans were committed to defending the approaches to Hill 192 which commanded the Bayeux-St. Lo road. Despite heavy casualties on D-Day, the 29th Infantry Division remained at the forefront of the American drive from Omaha to St. Lo and was charged with crossing the Elle River and protecting the right flank of the 2nd Division as it advanced on Hill 192. The Elle was a small, fordable stream, only 10 feet wide, but the very steep and wooded southern bank gave good ground for well-concealed emplacements. Its crossing would involve a number of bitterly contested actions. The American V Corps had advanced rapidly since getting off of Omaha Beach on June 7th, but that was about to stop as the battle for the hedgerows had begun.

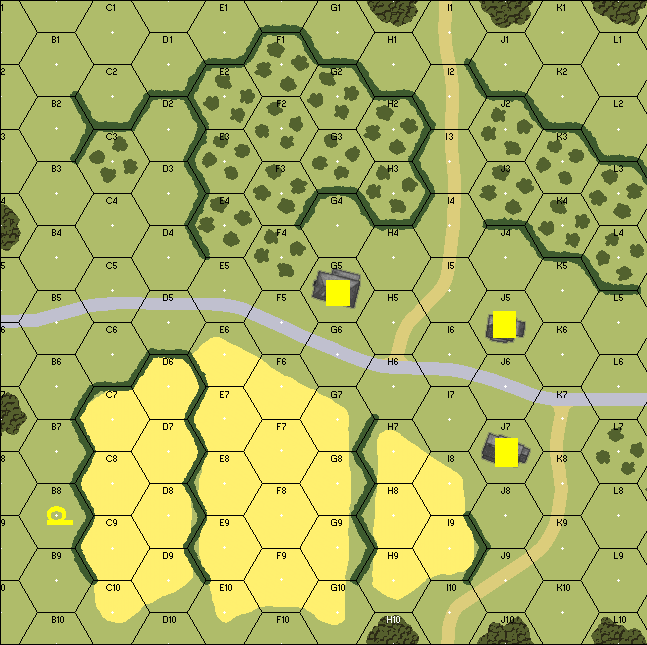
Victory Conditions: The Americans win at game end by controlling building hexes G5, J5 and J7 (Highlighted on map below)
Turn #1

With the Germans setting up with hidden initial placement the Americans would have to tread carefully (but quickly) through the Normandy bocage.

During their first turn the Americans pushed along from the southern edge of the map, electing to move through the slowing grain instead of the orchards to the North. This surprised me as in previous games speed had always been an issue for the attacker. Needless to say my (hidden) units were protecting a more northern attack ... but Andy didn't know that. The picture below is a snapshot at the end of American turn one - the Americans were spraying bullets into selected hexes to try and weed out any hidden German units. This worked and a defending 2-3-7 was uncovered and eliminated in close combat. The yellow circles are the target (victory buildings)

End of turn 1
Turn #2

The Germans, wishing to remain hidden to maximise their advantage (and not betray their lack of forces on the southern flank) held fire, so we moved onto American turn 2, which saw the strong American squads push along the southern edge of the map and trying to weed out more German units. The Germans during their second turn move a 2-3-7 Half-squad / LMG to cover the advance of the Americans.

End of turn 2
Turn #3

Entering turn 3 and things were beginning to heat up, the Americans using smoke to reach their first objective at J7. I was fairly confident here a the building held my strongest single force 4-6-7 / HMG / 2-3-7. This confidence wasn't to last long as I rolled a 6,6 only pinning the American unit (I had a massive 24 fire-power) and malfunctioning my HMG on it's first shot! Self donk Things were looking bleak as Andy moved more units into close combat range, threatening to take the first building with relative ease ... not so however as his approaching 6-6-6 unit was broken from J7 and more defensive fire from H3 broke his already pinned unit and he would be unable to enter close combat. Result!

Mid turn 3
The German turn 3 was no less eventful, especially now that the Americans had a juicy stack of units in I9 for us to shoot at. I successfully repaired my broken HMG and fired on I9 from three different hexes (see map) resulting in one broken American squad (importantly the one with the MMG). In the American defensive fire they broke my full squad 4-6-7 in J7 and I routed them back towards the leader in J5. This would later turn out to be an important move for me.

End of turn 3
Turn #4

With only a 2-4-7 in J7 I attempted (and failed) to recover the HMG there. Given the amount of American fire-power pushing towards J7, the building was all but lost. 6-6-6 moved from I9 to I8 and was pinned there and a 9-1 leader and 6-6-6 moved from I9 to J8 under smoke cover. The 2-4-7 defender in J7 rolled 1,1 but only managed to pin the leader. A final 6-6-6 also moved into J8 (from the trees at H10). Remaining fire from both sides was ineffective, leaving the Americans a fairly straight-forward close combat to take their first objective building J7, killing the 2-4-7 in the process.

End of American turn 4
Onto German turn 4 and the Americans fail to recover the German HMG left in J7. The Germans rally the broken 4-6-7 in J5 and ready themselves for the attempt to regain J7! During Prep Fire from J5 to J7 both American 6-6-6s are broken (this was probably the most critical engagement for both sides0, swinging the initiative back to the Germans following a sustained period of American progress. Further Prep Fire from H3 also broke the 5-4-6 in I8. The broken American units (2 x 6-6-6s and 1 x 5-4-6) rout to the 9-1 leader in J8.

End of German turn 4
Turn #5

The broken American units in J8 ALL fail to rally, but a 5-4-6 in I9 returns and moves into I8 only to be broken there by German defensive fire from J5. A 7-0 leader / MMG / 6-6-6 from I4 moves through cover to E4 attempting to put pressure on the hidden unit in building G5. 6-6-6 in G8 also moves on G5 moving right up to the building, taking point blank fire from the 2-4-7 / 7-0 leader / LMG in there. The Germans roll a 6,6 and another machine gun malfunctions! Are things starting to shift back to the Americans?

The Americans move into close combat in G5, but fail to make their ambush count and the battle moves into melee.

End of American turn 5
Two American units rally in J8, a 6-6-6 and a 5-4-6 (leaving one broken 6-6-6). The Germans then prep fired from H3 into the broken 5-4-6 in I8 reducing them to a 2-3-6. The Germans then take the opportunity to regain J7 by assault moving a 2-4-7 from J5 and then moving into J7 during APh. Unnecessary advancing fire from the remaining units in J5 against the already broken I8 malfunctions the German MMG in J5 (the 3rd of the game). I could have kicked myself at this point as the attack wasn't needed and I had now left myself weaker in what could end up being my last building.

Close combat in G5 results in the loss of a German 2-4-7, leaving only a weak leader defending the building.

The broken American unit routs from I8 into J8 with the 9-1 leader.

End of German turn 5
 Turn #6

The last turn of the game. It looked like the Americans would have just too much to do in their last turn to take back building J7, close off combat in G5 and take the German held J5 and this proved to be true, especially when the German 2-4-7 in J7 successfully recovered the HMG there.

Prep Fire into J7 only pinned the German unit there. A 9-1 leader from J8 attempted to draw fire by moving beside J5, but the Germans held-fire waiting for the movement of the American 7-0 leader / MMG / 6-6-6 in E4. As it turned out this unit's movement was cut shot at H6 as it broke under fire from H3. The game was effectively over as German defensive fire J7 > J8 and J5 > K6 broke the last effective American units. Objective buildings j5 and J7 were held and the Germans came out on top.

End of American turn 6 (and game end)

Final thoughts on this scenario...

I had set-up for an American attack along the northern edge as I thought this would be the quickest path for the Allies (bar coming straight up the middle!). Andy's set-up therefore was quite worrying as I had few forces in the south. (see German set-up positions below)

My Initial Set-Up For The Germans

At this point I decided that my best strategy was to stay hidden for as long as possible (Andy didn't know that I was weak in the south) and hope that it would slow him down. it didn't slow him as much as I would have liked but it did serve to make his movement a little more cautious (therefore a little slower). I really bemoaned my luck early on as I lost my first unit quite easily and then had my HMG malfunction on it's first use!

As the scenario progressed the luck would balance itself though first swinging one way then back the other leading to an exciting, if very stressful, finale. Obviously delighted to finish on top, but this one could easily have gone to the Americans.

Thursday, 20 September 2012

AAR - Memoir '44 - Sainte-Mère-Église

Memoir '44
The second scenario in our D-Day operations campaign from the war room archives sees the Allies trying to setup a defensive base at Sainte-Mère-Église.


D-Day Operations June/July 1944
Scenario #2 – Sainte-Mère-Église, June 6th 1944


Historical Background:

Establishment of a defensive base at Ste. Mère-Église was one of the key objectives of the US 82nd Airborne Division. In contrast with other regiments, the 505th Parachute Infantry, landing north-west of Ste. Mère-Église, had one of the most accurate drops. Rapidly regrouping and tipped by a French native to the presence of German troops in town, the paratroopers planned to surround Ste. Mère-Église and move in with knives, bayonets and grenades.

In the meantime, to the north, Lt. Turner Turnbull deployed his force on high ground near Neuville-au-Plain, engaging and fighting the enemy to a draw. This bought some crucial time for the battalions around Ste. Mère-Église, giving them a chance to meet the German southern thrust and annihilate several enemy units. This led to an overestimation by German command of American strength in this sector, and as a result, the Germans withdrew.

Sainte-Mère-Église Map


Briefing:

Axis Player(s): Tom & Pete

Axis Instructions:
Take 4 command cards

Allied Player(s): GaryG & AndyB

Allied Instructions:
Take 5 command cards.
You move first.

Conditions of Victory:
5 Medals – no other fixed conditions. The 5 medals will represent the balance of power in the area and ultimately who is forced to withdraw.

Special Rules:
Before the Allied side takes its first turn, the Allied player has an additional air-drop.

Hold 4 Infantry figures in your hand about 12 inches - roughly the height of the box set on its side - above the battlefield.

Drop the figures. If a figure falls off the board or lands in a hex with another friendly or enemy unit, this figure is out of action and placed back into the box. No Victory Medal is awarded to the Axis player on this occasion.

If the figure is not out-of-action, place an additional 3 figures from the box into the Infantry figure's hex. The unit landed safely and is ready for action.

Outcome:
Narrow victory for the Allies by 5 medals to 3 medals. Primary objective, Ste. Mère-Église, was not successfully taken in the planned operation.

Following a highly accurate air-drop by the Allies just north of Ste. Mère-Église, the German forces were hit heavily by an air attack in the north-east corner of the map. Undeterred, the Germans pushed forward in the west gaining significant ground albeit at a cost of a couple of units. Both sides made reasonably good use of their additional elite units, but it was becoming clear the the extra Allied forces were beginning to shift the balance of power in their favour.

The Allies at last turned their attentions towards Ste. Mère-Église, at one point taking control of a section of the town. This however left some of their units in the open and exposed to the might of the German armour. It was becoming clear that if the Allies continued to push for control of Ste. Mère-Église, that they would be risking the whole battle. So, giving up on the town, they finished off some German infantry, north of Ste. Mère-Église ultimately forcing a controlled German retreat.

Ste. Mère-Église would eventually come under Allied control, but almost a week too late. Objective was therefore failed (-1) despite the 5 Medals to 3 Medals victory in the battle.

Allies win with 5 Medals vs. the Axis 3 Medals.

Monday, 17 September 2012

AAR - Memoir '44 - Pegasus Bridge

Memoir '44
A war room archive from our Memoir '44 campaign inspired by AndyB playing this one on Sunday night at the WeeGamers bunker in Whitehead.


D-Day Operations June/July 1944
Scenario #1 – Pegasus Bridge, June 5th/6th 1944


Historical Background:

The late hours of June 5, 1944. Led by Major John Howard, the men of Oxford and Buckinghamshire Light Infantry step aboard six Horsa gliders on a secret airfield in Dorset. Their mission: to launch the first airborne assault of D-Day and capture two bridges, one astride the Caen Canal, the other over the Orne river, in Normandy.

A few minutes past midnight, now June 6, 1944, the gliders clip through the treetops and land in a small patch of rough field, between a pond and the Caen Canal, only yards away from their objective! Major Howard and his troops pour out of the planes, achieving complete surprise and rushing the stunned German forces. Despite furious opposition from a heavily sandbagged machine gun nest at the end of now famous ?Pegasus? bridge, they capture their objective within moments. To the east, the Orne bridge is secured equally rapidly, giving British troops the first victory of D-Day! BBC Historical Link

Pegasus Bridge Map


Briefing:

Axis Player(s): Pete & Tom

Axis Instructions:
Take 2 command cards (Germans were surprised). Draw two cards after turns 1 and 2. You will then have a hand of 4 command cards for the rest of the battle.

Allied Player(s): Gary & AndyB

Allied Instructions:
British: Major John Howard
Take 6 command cards.
You move first.

Conditions of Victory:

5 Medals*

*An Allied unit that captures a bridge hex (Pegasus & Orne) counts as one victory medal. Place an objective medal on each of the bridges. As long as the Allied unit remains on the bridge hex, it continues to count toward the Allied victory. If the unit moves off or is eliminated, it no longer counts. Both the “Pegasus Bridge” and the "Orne Bridge" must be taken as part of the Allied victory total.

Outcome:
The Allies began their advance to the bridges under the cover of darkness. However progress was slow and with daylight soon breaking through, Howard's men were spotted and found themselves under extremely heavy and accurate machine gun fire from the sandbagged German infantry at Pegasus Bridge. The resulting heavy Allied casualties, so early in their advance, would prove to be decisive and the initial Allied progress towards Pegasus bridge was painfully slow.

On the Orne Bridge flank, the German forces again spotted the Allied advance early and, taking up strategic defensive positions in the wooded areas close to the bridge, the Axis forces again effectively laid down heavy machine gun fire. As a result the Allied forces on the Orne flank never made any real progress towards securing the Orne bridge.

Back on the Pegasus bridge flank, the Allied forces soon rallied and succeeded in capturing the German sandbag position at the end of Pegasus bridge, suffering heavy casualties in the process. An immediate German counter-attack over Pegasus bridge soon recaptured the sandbagged position at Pegasus bridge, re-established German control of the area. Having suffered such heavy casualties the Allied forces could not mount another serious attack for the bridges and were forced to withdraw from the area of the Caen Canal, having failed in their mission to secure the bridges as objectives for the Allies.

Axis win with 5 Medals vs. the Allies 2 Medals.

Tuesday, 21 August 2012

AAR - FAB Sicily 19-Aug-12

FAB Sicily
Sunday was our second run at the 5-turn tournament scenario covering July 10, 1943 through to July 19, 1943. I took on the Axis forces against the combined efforts of GaryB (US forces) and AndyA (British forces).

Axis Setup

I knew that I'd be handing the Axis defence this week and read-up a little on some play-testing set-ups conscious that the Allies may elect to try the Alternate Landings instead of the Historical Landings used in Game #1. Unfortunately I was running late on the night and much of what I'd read was forgotten in my rush to get the game started. :)

There was however some method in my madness as I expected the British to deploy in the B2 through B6 landing areas (line A) to put pressure on the Port at Syracuse and the Port at Catania through Lentini, so I left Modica (point E) unpopulated. Elsewhere I constructed my own "Maginot line" (point I) as a strong fallback position should the Allies go for the Historical Landings.

(1) Axis Setup
Otherwise the random untried Italians were on coastal defence (to gain Field Works markers) and fairly spread out along some of line B as well as lines C and D. Looking back, I can see some clear weaknesses, especially around the Port of Palermo from points G and H, but the Allies didn't choose to exploit those in their set-up.

I also didn't consider placing any units around Messina (red area F in the picture). There are a lot of potential victory points here for the Allied player, but I felt that I could route the more mobile armoured units there if I needed to.

Allied Setup

Having considered my Axis setup the Allies chose the Alternate Landings option and placed their British forces in A4 and B1 through B4, with their US forces in D10 through D13 as pictured below.

(2) Allied Invasion Setup
From an Axis point-of-view I was quite pleased with their choices and felt that I could manage my forces well enough to cope. Turn one would be a bit of a wake-up call for this early optimism.

Turn #1

The Allied landings were an almost complete success and only one untried Italian unit survived the beach assaults vs. the US 1st Infantry in Monti Sicani (point A below). The Allies claimed an undamaged Port Syracuse and claimed their first Fading Italian Morale chit for the draw bag.

View after Allied turn #1
My untried units mostly failed their morale checks and generally rolled poorly against the mighty invasion forces, in fact my only success was to eliminate the US 82nd Airborne who dropped straight into combat with the two Livorno Mobile Infantry units at Canicatti (point B above). This airborne unit was worth 1VP to the Axis.

During the Admin Phase of my Axis turn I damaged the Port at Catania (point A below), blew bridges on the Simeto River (point B below) and built defensive field works in Val Di Catania, Vizzini and Caltanissetta (orange dots below). Meanwhile the Allies were using the British 3rd Commando asset to perform a flanking invasion at Lentini (point C below). These commandos survived and would remain awaiting Allied reinforcements.

View after Axis turn #1
A Panzer IV
During movement I brought the HG Armoured Panzer Division forward to Sortino to try and halt the Allied advance (movement D above).

The beleaguered green Italian unit in Monti Sicani was also reinforced by a strong Assietta Mountain Infantry unit (movement E above) and I reserve moved the Elite 15th Panzer Grenadier to the centre of the island in order to support the VP in Caltanissetta (movement F above). +7 NET VPs to Axis

Turn #2

Could the Allies exploit a gap in the Axis lines?
As we entered turn #2 I was sure that I'd made a mistake and opened the door for the Allies by leaving a gap in my lines at Mussomeli. To protect the VP at Caltanissetta I blew bridges across the Platani and Salso Rivers.

Allied infantry did indeed move through the Mussomeli Gap (movements A and B below) and re-engaged the strengthened Italians at Monti Sicani (point D below). These advances and assaults would prove a devastating failure for the US forces.

A critical passage of play.
Firstly their assault at Monti Sicani met with stiff resistance from the Assietta Mountain Infantry and the US 1st Infantry sustain heavy losses with both units reducing down to one strength each.

Worse was to come however as their drive to exploit the gap in the Axis lines had created one in their own between Canicatti and Agrigento (Axis movement D in the picture to the left). My Livorno Mobile Infantry units moved in picking up 2 VPs from the unprotected beachheads.


I felt pretty bad for not warning them during their Movement Phase, but it was something that we'd covered in our first game. This is WAR after all! :)

Victory Points by turn.
These turn #2 losses, combined with another lost airborne unit saw the Axis forces move into a +10 NET VP lead moving into turn #3. A sudden death victory could be called after 4 turns if the Allies were on +2 NET VPs or the Axis were on +8 NET VPs, so my position was beginning to look almost comfortable.

Turn #3

Stung by the events of Turn #2, the Allies had to respond choosing to complete their breakthrough on the Axis lines and threaten both Termini Imerese (point B) and halving the distance to Messina itself (point C) with the Elite 45th Infantry.

The Allied Fightback
The US also withdrew two units back to the coast and assaulted the brave Livorno Mobile Infantry cutting off the Axis supply line in to them in the process (point A).

Meanwhile the British forces were struggling to make huge progress, but still threatening to capture the airfield at Niscemi. Generally the Allied battles were more successful in Turn #3, but they didn't manage to capture either Termini Imerese or Cattolica Eraclea despite significant Axis losses.

Allied 45th caught and destroyed at Nicosea

In the responding Axis turn I reinforced Termini Imerese (point B below) and sent an elite PG armoured division to deal with the breakaway US 45th Infantry unit at Nicosea, en route to Messina (point A below and in right-hand picture).

Axis Clean-up.
Our evening was drawing to a close and Turn #3 ended with the Allies losing their breakaway unit to give the Axis a +11 NET VP total. The Allies conceded defeat at this point.


Final Thoughts

Tonight's game really brought the game to life for me and although we are still getting the odd rule wrong, our pace has picked up considerably and we better understand the general flow of play. I was a little fortunate this evening, turning a genuine mistake into an opportunity to score two VPs from the US beachhead markers, but generally I was happy with how I handled the Axis forces.

I'd like to give the original fast action battles game "FAB Bulge" a try now and hope to pick-up FAB: Golan '73 when it comes out.

Next up is the full 9 turn campaign game via VASSAL.


Monday, 30 July 2012

AAR - ASL SK1 Scenario #S3 - Simple Equation

ASL Starter Kit #1 (MMP)
This second scenario "Simple Equation" in our ASL Starter Kit series is based around the Allied assault of Aachen, Germany in October 1944.
Simple Equation

Attacker: American (3rd Batt., 26th Infantry Regiment) (ANDREW)
Defender: German (404th Regiment, 246th Volksgrenadier Division) (GARY)
Turns: 6.5 Players: 2 OBA: None Night: No
Aachen, Germany 1944-10-12


RESULT: Game conceded in turn #5 . Germans (GARY) win.

Overview
Aachen Germany 12th of October 1944: The battle for the city of Aachen had been raging since 10th of October. A complicated series of maneuvers designed to encircles the city from both the north and south had been occupying the attention of the American command. These few units committed to the frontal assault of Aachen had some tough going. Not only were the Aachen defenders numerically superior, but they were fighting on their home soil for one of the cherished Nazi symbols; Aachen home of the First Reich.

The Battle of Aachen was a battle in Aachen, Germany, that took place in October 1944 in World War II. At the time of this battle, there were only about 20,000 civilians living there; the remainder of the 160,000 inhabitants (1939 census) had been evacuated by German commander Gerhard von Schwerin to protect them from Allied attacks. When von Schwerin contemplated surrender to protect the city's artifacts from air raids, Hitler had him removed. Hitler then sent about 5,000 Volkssturm to defend the city, commanded by Gerhard Wilck.

Victory Conditions: The Americans win immediately if they control 25 or more building hexes on mapboard z.

Initial Setup
Turn 1

Early American movement and defensive fire from the Germans

The green arrows above reflect early American movement as they CXed (double-timed) most of their units moving them individually into buildings H3, I4, J3 and K4. They took some fire from a few of the German units, but only had one unit pinned in H3. In return the Americans used fire-groups on I2 breaking the 7-0 leader and forcing him to later rout back to X1.

The map below shows a snapshot at the end of the American turn 1.

At the end of American turn #1
So overall some heavy firing from the Americans and some fairly insignificant fire from the Germans (who are mostly out of range), but limited damage on both sides.

Turn 2

Turn 2 saw a little movement in the centre by the Americans as they tried to gain a foothold across buildings I2, J1 and K2. during this drive a couple of smoke grenades were released in I3 and J2 to mask their crossing. All did not go smoothly though as one of their early 6-6-6 units broke and was forced back. The Americans did manage to take J1 and K2, but with a weaker force than they had wanted as most of their units still sat across the street. On the other side the Germans had limited movement and were under constant pressure from the heavy American firepower with units breaking in R1 and Z1. The Germans are trying to achieve a controlled retreat to slow the Americans down, especially in the key centre hexes. 

The American advance grinds to a halt.
Turns 3 & 4

A second American push!

Where to begin!? These turns saw a real push from the Americans as they laid more smoke down in K5 to mask their advance in both the centre and the right flank.

A couple of mistakes were made giving the Germans an opportunity to catch the Americans in the open albeit through the smoke and the German HMG in X1 peppered hexes L2, M2 and M3, but three good order American units still managed to successfully reach the right wing. In the centre the Germans had a point blank opportunity to attack the woods hex J0 (Pinned marker) from X1, rolling on the 36 column. I rolled 6,6 to completely fumble the attack (and break an HMG and a LMG!!!) but critically still managed to pin some of the American units including the flamethrower (which could not be fired by a pinned unit!). The Germans then used their advance phase to move back out of X1 and into X2. I had the option to go into close combat in J0, but have been concentrating on the controlled retreat to maintain my units. I hope it doesn't come back to bite me on the ass!

Turn 5

With only two full turns left the Americans (Andy) needed to push on through the centre and on the right flank to try to take the building hexes required for victory (25 in total on board X). Initial PREP fire on W2 pinned my units and his dropped SMOKE in I1 to protect his units who were advancing individually towards the woods hex between G1 and I1. I fired everything I had from my stack in X2 and (through mostly residual fire!) managed to break all but two of his advancing units (an 8-0 leader and a 6-6-6), which ended up in the target woods hex. Note the positions of the American units on the right flank, they would soon also be moving.

American units in the centre break under heavy German firepower.

On the right flank the Americans had three fairly strong units (P2, P1 and N0) and an excellent 9-2 leader. Fortunately for the Germans I had managed to rally the broken units in the building hex R2 and waited for the inevitable American attack. As they advanced, I managed to successfully pin the unit in building hex R1 and then fired on the unit approaching through S2. At this point any further firing would have likely broken my units as they came under sustained enemy pressure, so I elected to hold and wait for close combat. Back in the middle a rogue unit also assaulted into K1, but was immediately broken.

Americans surround buildings to the East.

In close combat for building hex R2 the Americans made a successful ambush roll and had enough bonuses to kill off all of the German units before they had a chance to respond.

Americans now control the eastern buildings, but are running out of time in the centre.

By the time we had reached the German turn 5 things were beginning to look very difficult for the Allies. Many of their broken units were without a leader to rally them and still under DM and they still had 22 or so building hexes to capture in two turns. The Germans on the other hand rallied successfully and moved (out of LOS) their units into prime defensive positions whilst keeping the American opportunities for defensive fire at an absolute minimum.

The expected final American push in the centre doesn't happen.
The Americans then conceded the game.

Sunday, 29 July 2012

AAR - ASL SK1 Scenario #S1 - Retaking Vierville

ASL Starter Kit #1 (MMP)
This is the first in a series of ASL Starter Kit after action reports (AARs) and is based on the Allies trying to take the town of Vierville in northern France.
Retaking Vierville

Attacker: German (1058th Grenadier Regiment/919th Grenadier Regiment/6th Fallschirmjäger Regiment) (GARY)
Defender: American (1st Batt. 506th PIR, 101st Airborne) (ANDREW)
Turns: 5 Players: 2 Germans (twyearling) and Americans (Blaze) OBA: None Night: No
Vierville, France 1944-06-07

RESULT: German victory. (GARY)

Background

Why is Vierville important?

Vierville is along the main route from Utah Beach to the German position at St. Come du Mont. At the end of D-Day St. Come du Mont is still a German strongpoint. This game takes place on D-Day+1. Vierville is necessary for control of the road and to allow the movement of troops and equipment inland. To take and hold St. Come du Mont the Allies must control Vierville.

A map of the area surrounding Veirville
Objective

Prevent any good order German squads from occupying objective buildings, marked with red dots on the map below, at the end of the game.

The Troops

US 101st Airborne - These are elite troops equipped with automatic weapons and smoke grenades. They have excellent firepower but limited range. They may split up their fire between adjacent enemies and are good at assaulting positions.

German Grenadiers - These are either first or second line troops with good morale. They have average firepower and average range. Troops from the 919th Grenadier Regiment are not as accurate at greater ranges. They have limited availability of smoke grenades.

German Fallshirmjager - These are elite troops with excellent morale equipped with automatic weapons. They have good firepower but limited range. They also have good assault capability and smoke grenades. They have good leadership.

Order of Battle

US 1st platoon - 3 squads, 1 half squad, senior NCO. Begins in town.
US 2nd platoon - 3 squads, senior NCO. Enters from the right hand side on turn 1.
US 3rd platoon - 2 squads, NCO. Enters from the right had side on turn 2.
US 4th platoon - 2 squads, 2 half squads, experienced officer. Enter from the right hand side on turn 3.
German 1st Grenadier platoon - 3 squads, senior NCO. Enters from the bottom on turn 1.
German 2nd Grenadier platoon - 3 squads, junior NCO. Enters from the top on turn 1.
German 1st Fallshirmjager platoon - 3 squads, senior NCO. Enters from the bottom on turn 2.
German 2nd Fallshirmjager platoon - 2 squads, senior NCO. Enters from the bottom on turn 3.

Victory Conditions

No good order German units should occupy hexes with red dots at game end
Okay, I'll try and describe the last turn...

I (playing the Germans) needed to protect hex L3 as my objective was to have a working order unit in one of the red dotted hexes in the map below (L3, M4, N6 or N5). Going into the last turn I was moving first and tried to get as much support to L3 as I could. Unfortunately Andy had the roads pretty well covered and the single units I sent out were getting cut down as soon as they ventured into the streets. Finally I elected to position units at positions A and C to cover my beleaguered unit at B. I was fairly happy with the result as I had three strong corridors of fire (blue arrows) covering the streets around L3. Taking a deep breath I prepared for Andy's final attack. He needed to force me out of L3 to claim victory himself.

Despite continuous America assault, the Germans hang on!
Moving single units to use up my defensive fire looked to be working well, but this was leaving a wall of residual fire markers (the red flashes) along main street and cost Andy a number of morale checks. Still, as the dust settled, he managed to get three fairly strong units into building hex M4 and ready for the close assault to L3.

My remaining units in L3 were pretty badly shot up, having been in melee fighting for most of the game. Now they had to withstand one final assault and this came down to three American close combat rolls (All 3:1 ratio so looking for 7s or less due to a CX modifier). The Americans needed three successes, but ultimately didn't get any and the Germans held their ground winning the scenario. Phew!